Oct 25, 2023
Understanding the Exposure Triangle: A Photographer's Guide to Perfecting Exposure
By Martin Rak
Your Award-Winning Tutor
In the world of photography, mastering exposure is a fundamental skill that can make or break a shot. The exposure triangle is a concept that lies at the heart of understanding exposure, and it forms the basis for capturing well-lit and visually stunning images.
In this comprehensive guide, we'll delve into the exposure triangle, breaking it down into several subheadings to help you grasp its intricacies and apply it to your photography with confidence.


Introduction to the Exposure Triangle
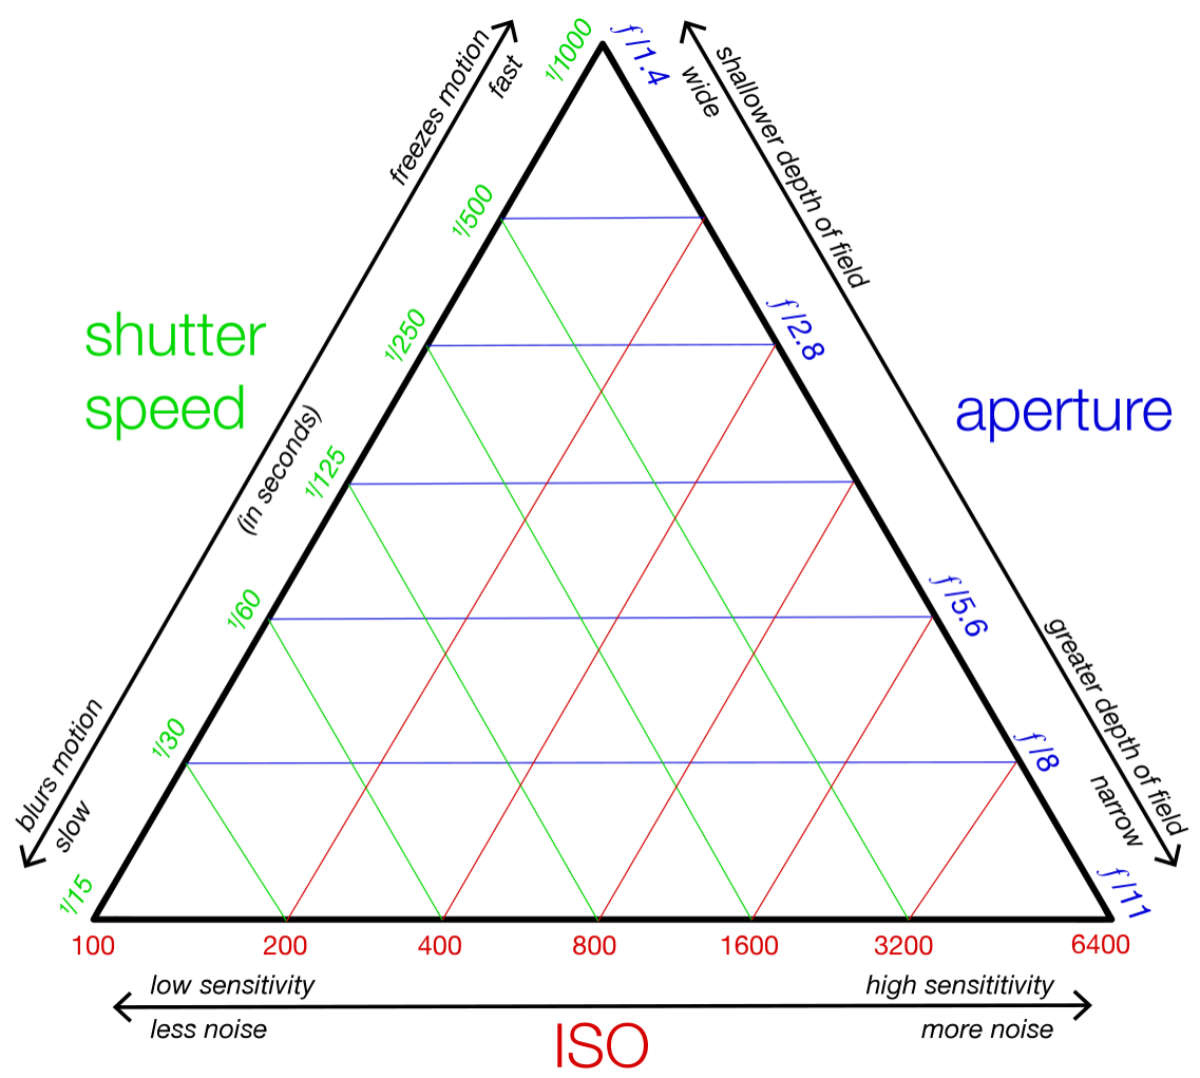
The exposure triangle is a visual representation of the three key elements that control the exposure of a photograph: aperture, shutter speed, and ISO. Each of these elements plays a crucial role in determining the amount of light that reaches the camera sensor, resulting in a properly exposed image.
Understanding how these three factors interact is the key to unlocking your creative potential as a photographer.
Learn also: Guide to Wide-Angle, Normal, and Telephoto Lenses for Breathtaking Landscape Photography
Aperture: Controlling Depth of Field
Definition and Function of Aperture
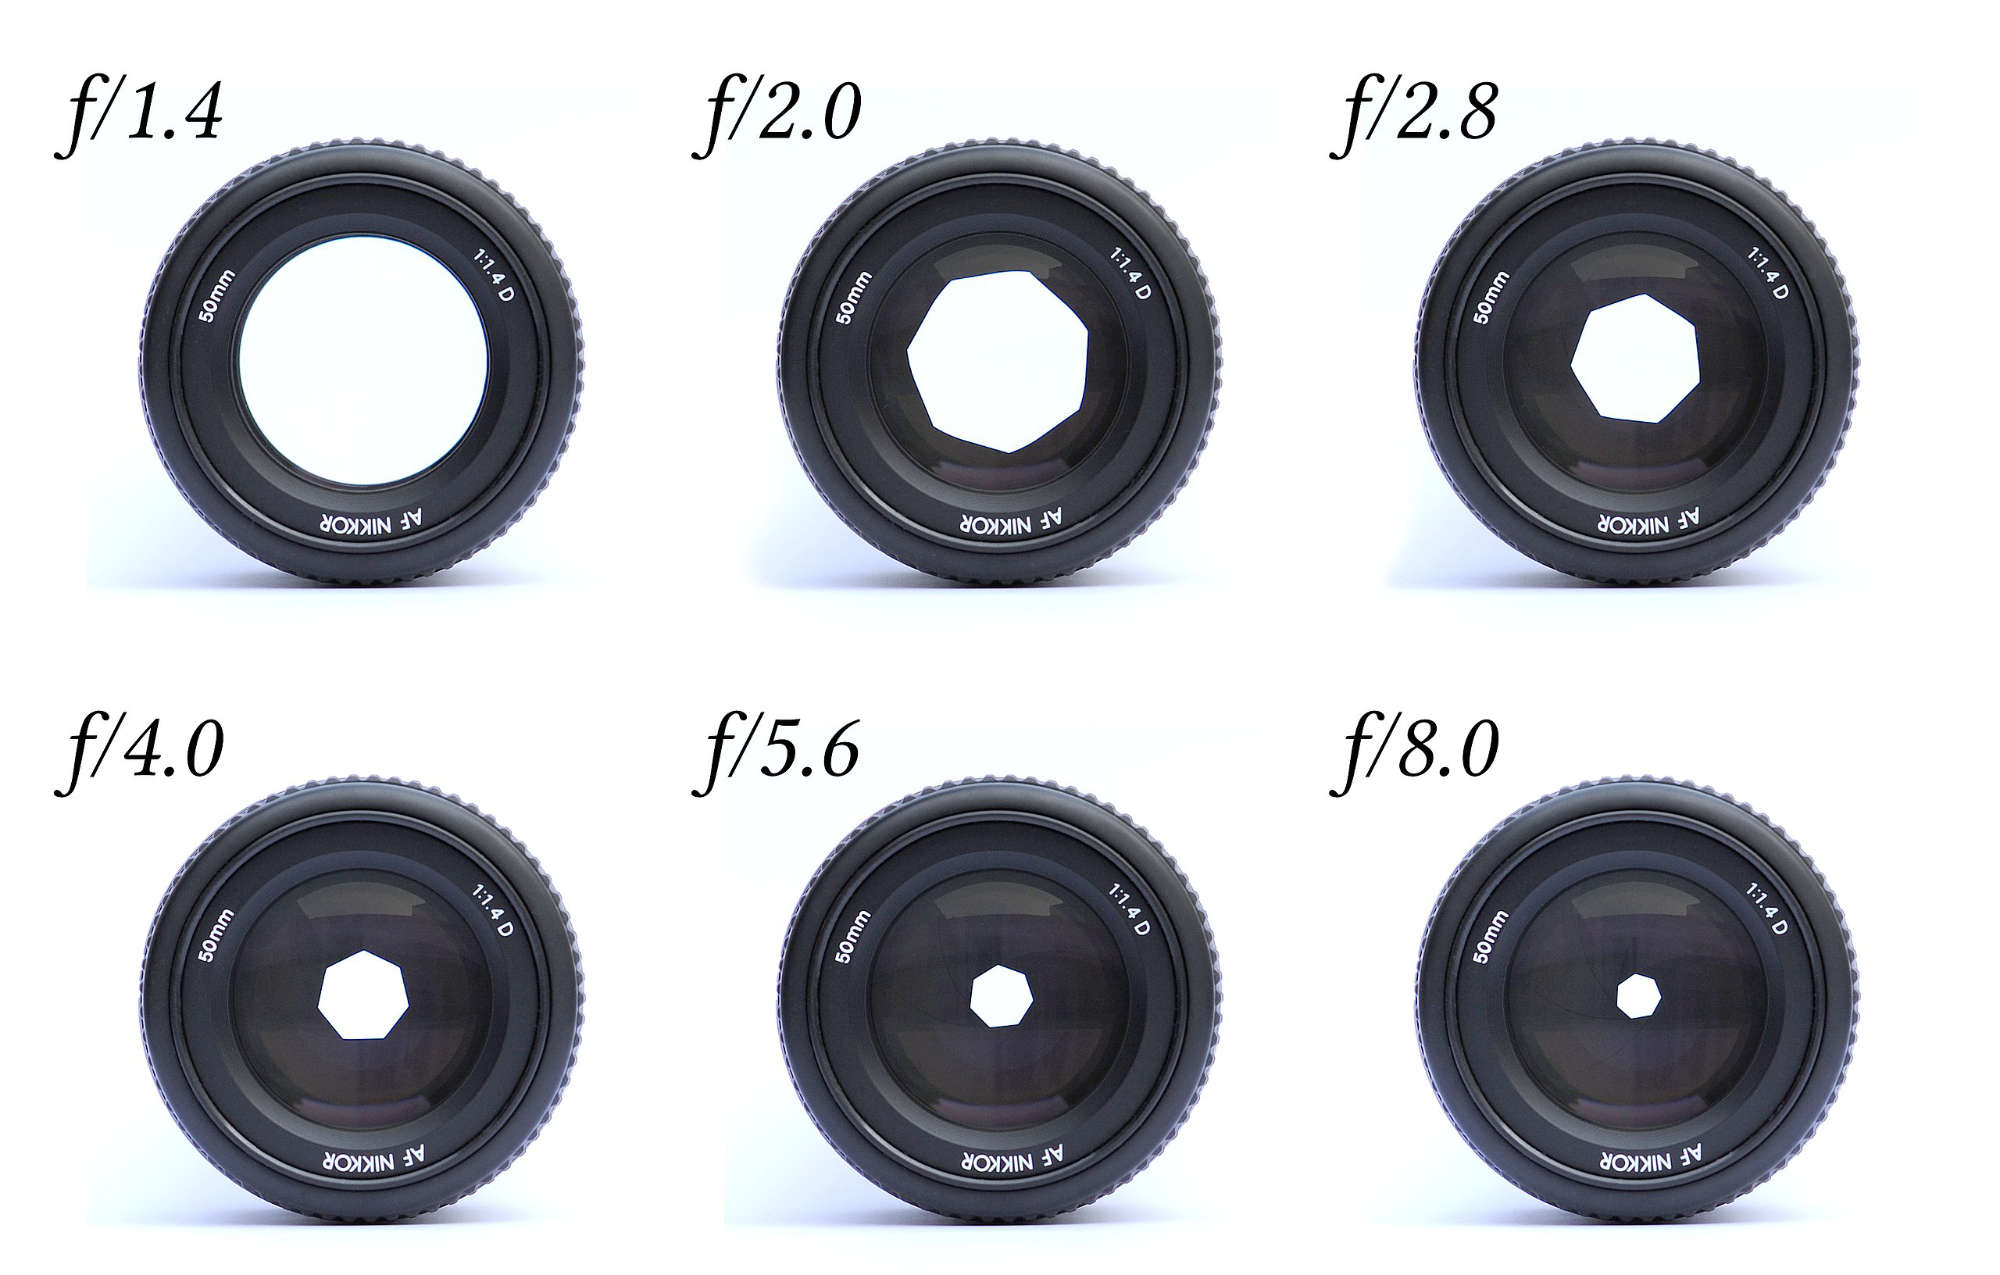
Aperture is one of the three pillars of the exposure triangle, alongside shutter speed and ISO. As mentioned earlier, it refers to the opening in the lens through which light passes to reach the camera's sensor. The size of this opening can be adjusted by changing the aperture value, which is measured in f-stops. Each f-stop represents a specific numerical value that determines the amount of light that is allowed into the camera.
Understanding Depth of Field (DOF)
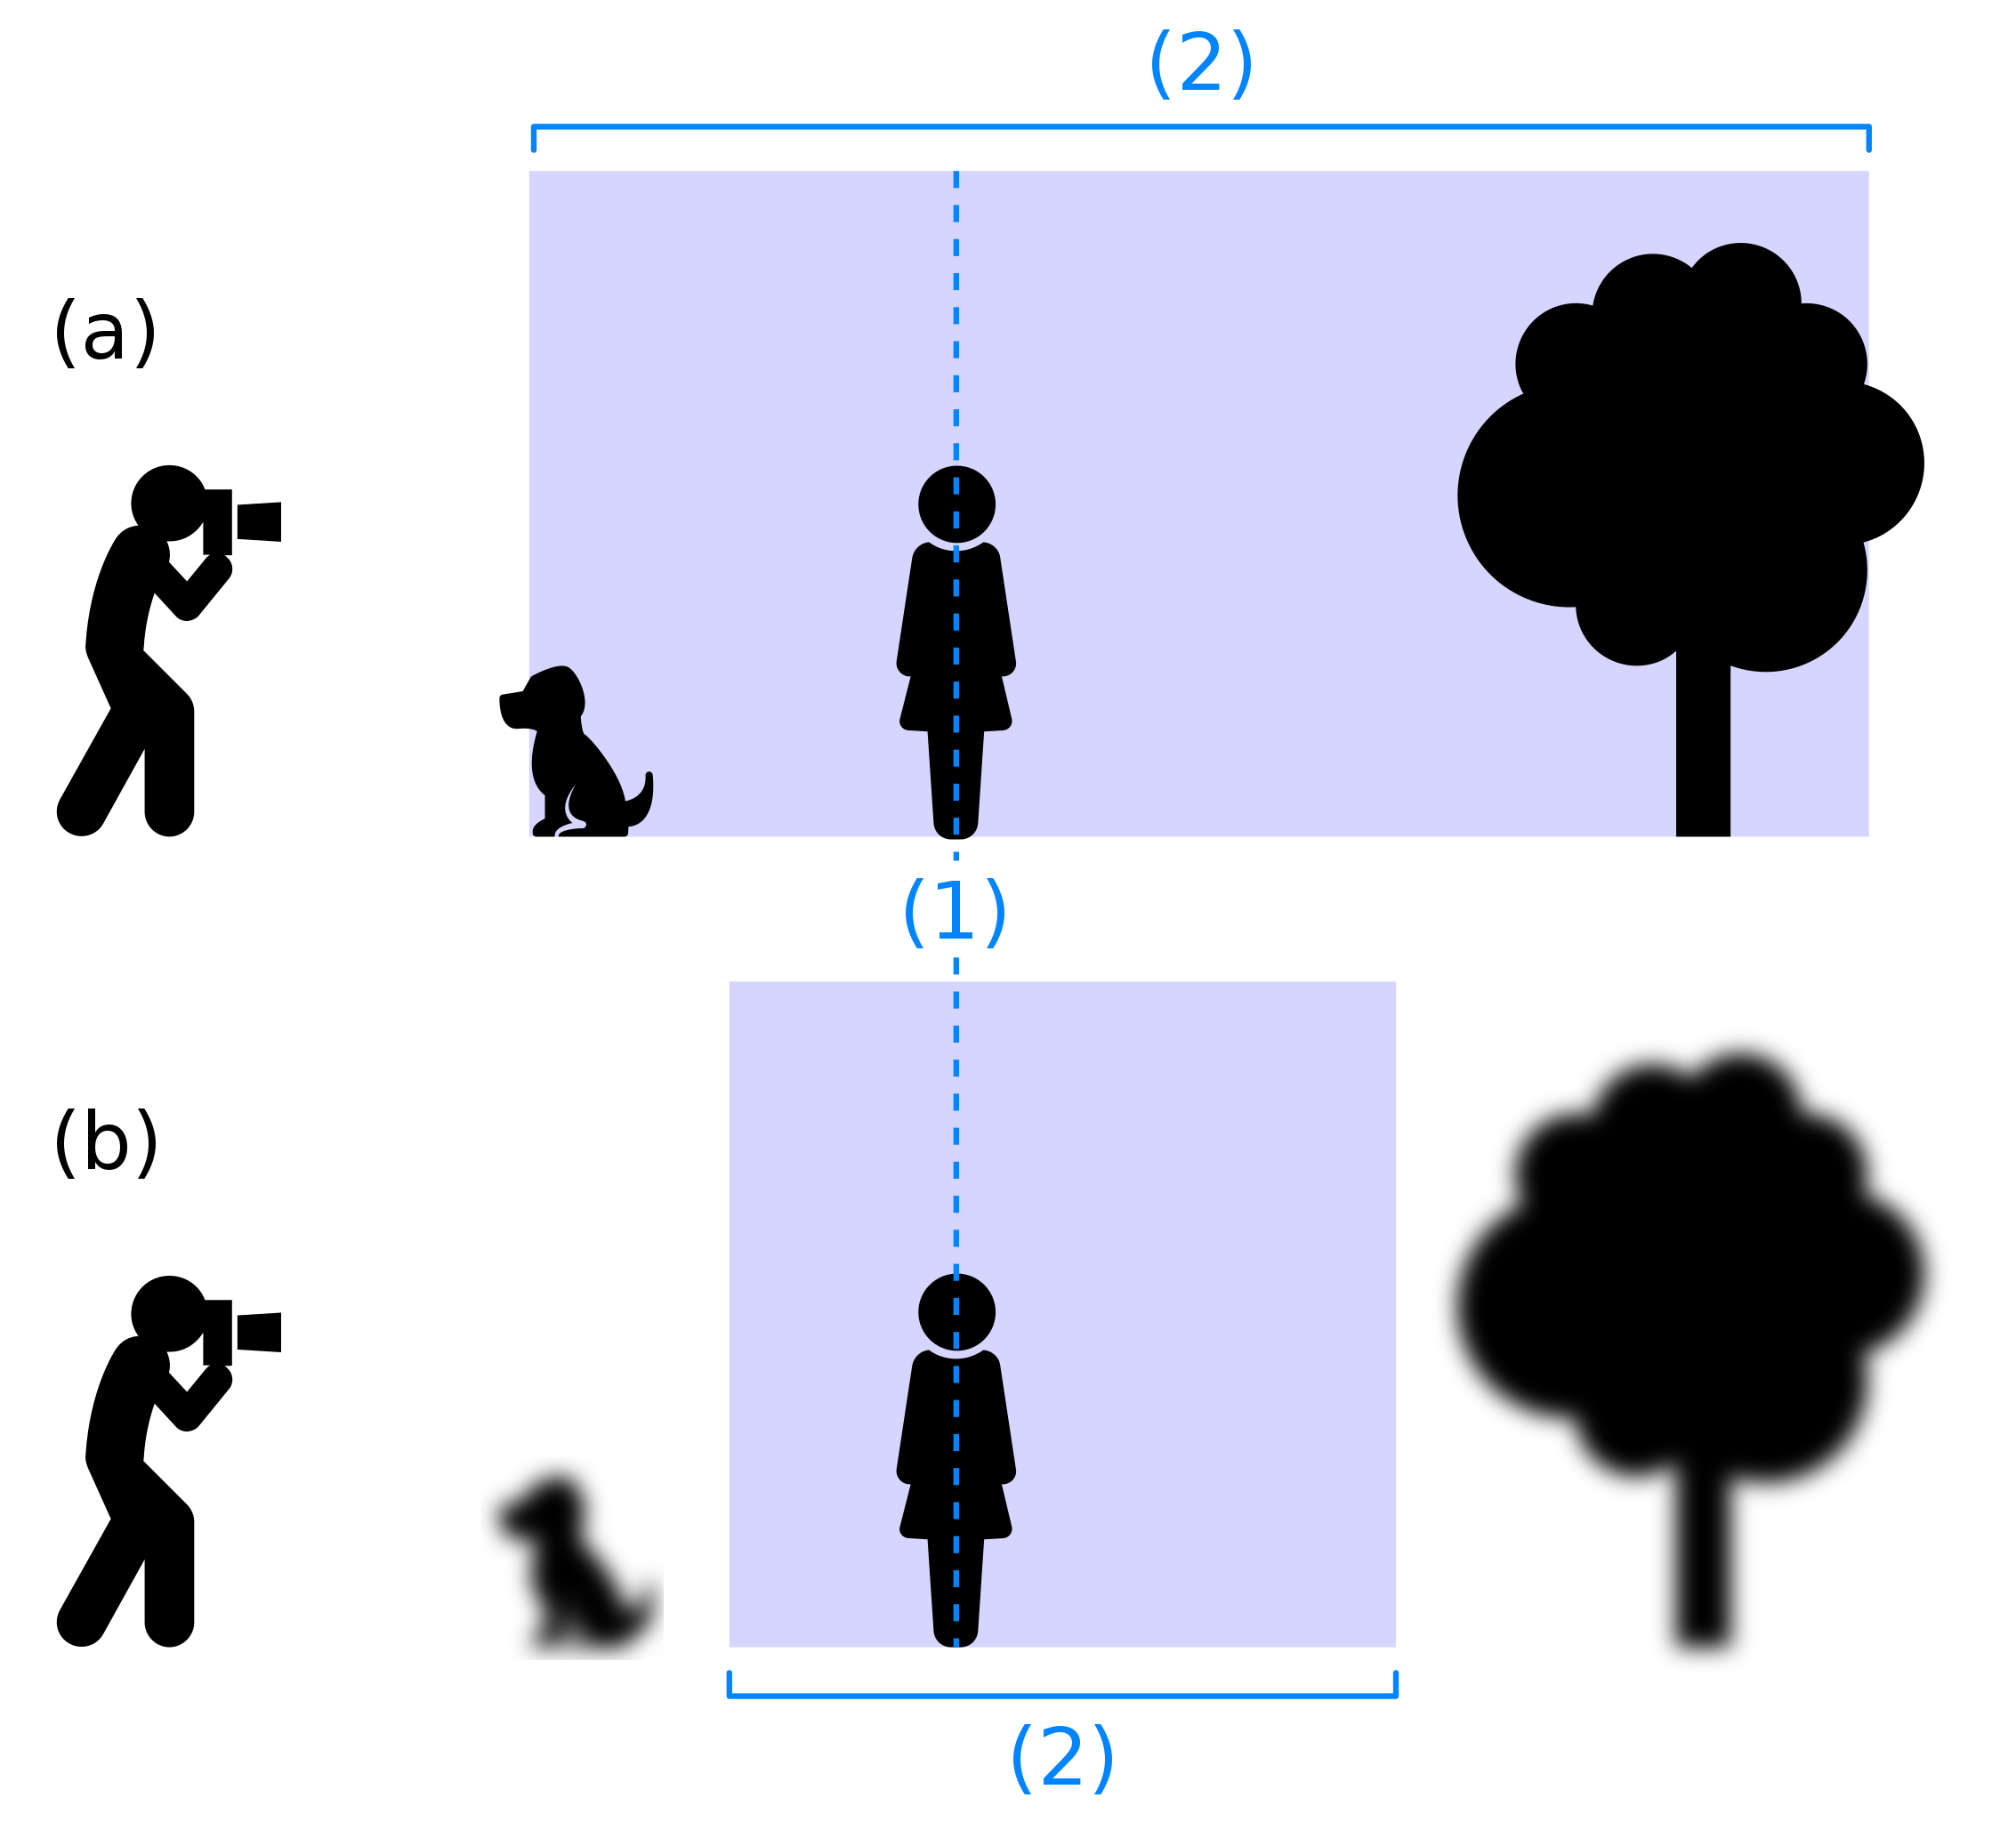
Depth of field (DOF) is a fundamental concept in photography and is heavily influenced by the aperture setting. In simple terms, DOF refers to the range of distance within a scene that appears sharp and in focus. When the depth of field is shallow, only a small portion of the image is in focus, while the rest is blurred. Conversely, a deeper depth of field results in a larger portion of the scene being in focus.
The Impact of Aperture on Depth of Field
Aperture plays a crucial role in controlling the depth of field in a photograph. A wide aperture, represented by a low f-stop number (e.g., f/1.8), allows more light to enter the camera, creating a shallower depth of field. This is commonly used in portrait photography, where the subject is sharply focused, and the background is beautifully blurred, drawing attention to the person being photographed. This effect is known as "bokeh," and it can add a sense of depth and aesthetic appeal to portraits.
On the other hand, a narrow aperture, represented by a high f-stop number (e.g., f/16), restricts the amount of light entering the camera, resulting in a deeper depth of field. This is often utilized in landscape photography, where photographers aim to capture intricate details throughout the entire scene, from the foreground to the background. By using a narrow aperture, the photographer can ensure that everything within the frame is in sharp focus, allowing viewers to explore the entire scene with clarity.
Creative Use of Aperture in Photography
Mastering the art of controlling aperture opens up a world of creative possibilities for photographers. By intentionally manipulating the depth of field, photographers can convey different moods and messages in their images. Here are some examples of how aperture can be creatively used:
- Portraits: In portrait photography, a wide aperture is often preferred to isolate the subject from the background and create a sense of intimacy. This technique helps draw the viewer's attention to the person's face, capturing their emotions and expressions in an engaging manner.
- Macro Photography: In macro photography, where the subject is extremely close to the camera, using a wide aperture can help isolate the tiny subject against a soft and blurry background, allowing the intricate details to stand out.
- Landscape Photography: For landscapes that require sharpness from the foreground to the background, a narrow aperture is the way to go. This ensures that the entire scene, from the closest element to the farthest horizon, is in focus, providing a breathtaking view of nature's beauty.
- Creative Backgrounds: Experimenting with various aperture settings can also lead to unique and creative backgrounds in photographs. Bokeh, achieved with a wide aperture, can transform mundane backgrounds into dreamy, visually appealing elements that complement the main subject.
Conclusion
In conclusion, aperture is a powerful tool in a photographer's arsenal, and understanding its role in controlling depth of field is essential for capturing striking images. Whether you're aiming for artistic portraits with creamy bokeh, detailed landscapes, or captivating macro shots, mastering aperture settings will undoubtedly elevate your photography to new heights.
As you continue to explore the creative possibilities, you'll develop your unique style and visual storytelling abilities, allowing you to communicate your vision effectively through your photographs.
Learn also: Photoshooting with Hasselblad X1D
Shutter Speed: Freezing or Blurring Motion
Definition and Function of Shutter Speed
Shutter speed is a critical component of the exposure triangle that directly impacts the way motion is captured in a photograph. It refers to the length of time the camera's sensor is exposed to light when taking a picture. Shutter speed is measured in seconds or fractions of a second, denoted by values like 1/1000, 1/250, or 1".
Motion Blur vs. Freeze
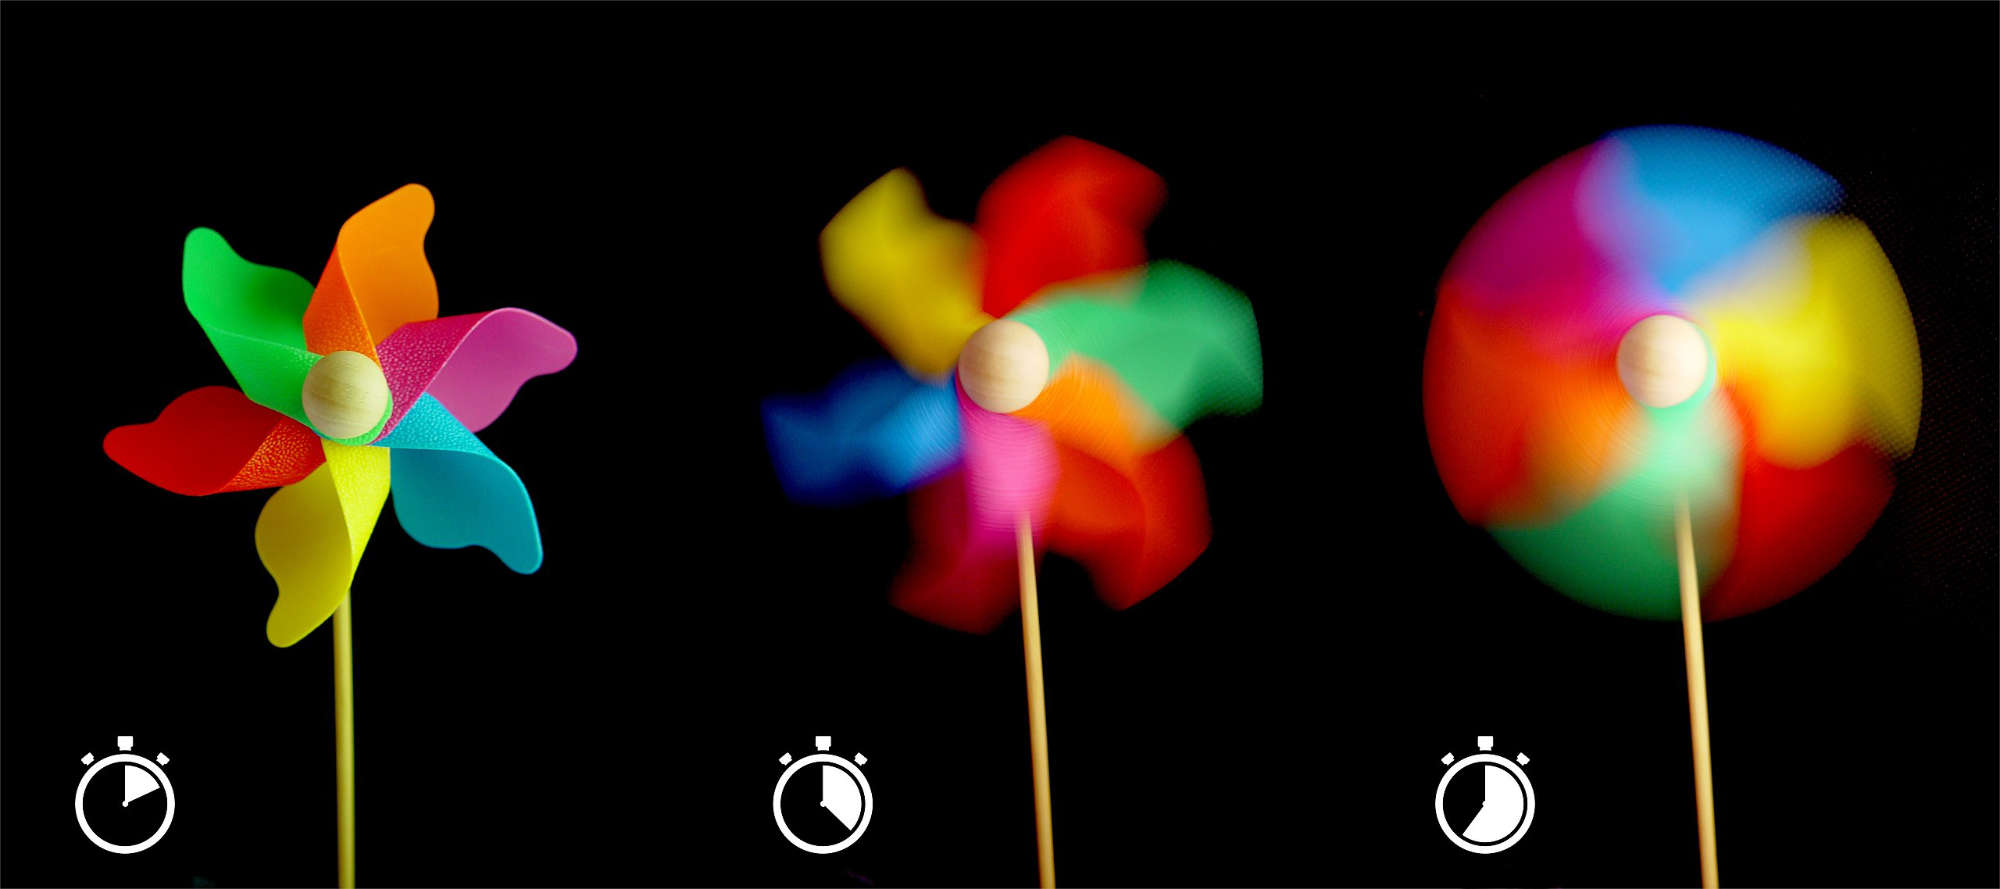
One of the key functions of shutter speed is controlling how motion is rendered in a photograph. A fast shutter speed, such as 1/1000 or 1/500, is capable of freezing fast-moving subjects in action. This makes it ideal for capturing sharp, high-speed moments in sports, wildlife, or any dynamic scene where split-second timing is crucial. For instance, using a fast shutter speed, you can capture a racing car in sharp detail as it speeds around a racetrack or freeze a bird in mid-flight, showcasing every feather in perfect clarity.
Conversely, a slow shutter speed, such as 1/30 or 1", introduces motion blur to moving elements in the frame. This occurs because the longer exposure time allows the camera to record the subject's movement over a period, resulting in a blurred effect. Motion blur can be creatively employed to convey a sense of movement, add a dynamic element to an image, or evoke a feeling of serenity. For example, photographing a flowing river with a slow shutter speed creates a silky, ethereal effect, and capturing the hustle and bustle of a city street at night with long exposures can produce captivating light trails from passing vehicles.
Panning Technique
The panning technique is an exciting creative application of shutter speed that enables photographers to capture a subject in motion while maintaining a sharp focus on the subject while blurring the background. This technique involves tracking a moving subject with the camera as it moves horizontally or vertically, following the subject's motion.
To execute the panning technique successfully, a slow shutter speed is typically used, often in the range of 1/15 to 1/60 of a second, depending on the speed of the subject and the desired effect. As the photographer tracks the subject's movement, they press the shutter button and continue to move the camera smoothly in sync with the subject's motion.
The result is a photograph that freezes the moving subject in sharp detail while the background appears streaked or blurred, creating a strong sense of speed and movement. Panning is commonly used in sports photography, particularly in motorsports, cycling, or athletics, where it can highlight the speed and action of the athletes or vehicles.
Achieving a successful panning shot requires practice, as it demands coordination between the photographer's movements and the subject's motion. It's essential to maintain a steady and smooth motion while tracking the subject to avoid any jerky movements that may compromise the sharpness of the subject.
Experimenting with Shutter Speed
As a photographer, having a thorough understanding of how shutter speed affects motion in photography opens up a world of creative opportunities. By experimenting with different shutter speed settings, you can capture various moods and emotions, convey a sense of time and movement, and infuse your images with dynamic energy or serene stillness.
For instance, using a fast shutter speed during a sports event can immortalize a single moment in time, freezing a basketball player mid-jump or capturing a soccer ball suspended in the air during a goal-scoring moment. Conversely, a slow shutter speed in street photography can introduce an artistic blur to the movement of people, revealing the flow of life in a bustling city.
Conclusion
In conclusion, understanding the relationship between shutter speed and motion is crucial for photographers seeking to harness the full potential of their creative vision.
Whether it's freezing action with rapid shutter speeds or crafting dreamy long exposure effects, mastering the art of shutter speed empowers you to capture images that resonate with viewers and tell compelling visual stories. So, grab your camera, experiment with different shutter speeds, and let your photographic journey be a thrilling exploration of time, movement, and artistic expression.
Learn also: Uncover What’s in Martin Rak's Camera Backpack
ISO: Balancing Sensitivity and Grain
Definition and Function of ISO
ISO, which stands for International Organization for Standardization, represents the camera sensor's sensitivity to light. In digital photography, it's a crucial element of the exposure triangle, along with aperture and shutter speed. ISO values are standardized and typically range from 100 (low sensitivity) to higher values like 800, 1600, 3200, and beyond (higher sensitivity).
Understanding Noise and Grain
While increasing the ISO setting can be beneficial in low-light situations or when you need a faster shutter speed, it comes with a trade-off: higher ISO values can introduce digital noise (in digital cameras) or film grain (in film photography) to the image. Noise and grain manifest as random speckles or color distortion and can significantly impact image quality.
In digital photography, noise usually becomes noticeable in images taken at higher ISO settings, where the camera sensor amplifies the light signal to compensate for the low light conditions. This amplification process also amplifies any electronic interference, creating the undesirable noise. On the other hand, film photography produces grain due to the chemical reaction of light on the film surface.
Choosing the Right ISO
Selecting the appropriate ISO setting is a critical decision for photographers, as it directly affects the quality and mood of the final image. Achieving the perfect balance between using a high enough ISO to capture a well-exposed image in challenging lighting conditions and keeping noise or grain at an acceptable level requires thoughtful consideration.
- Low ISO (e.g., ISO 100-400): When shooting in bright, well-lit conditions, using a low ISO is recommended. This setting helps maintain optimal image quality, as it minimizes noise or grain, and ensures that the photo retains a high level of sharpness and clarity. Low ISO is ideal for outdoor photography on sunny days or when using ample artificial lighting.
- Medium ISO (e.g., ISO 400-800): In situations where the lighting is moderate, photographers might opt for a medium ISO setting. This range strikes a balance between maintaining image quality and achieving a faster shutter speed. It's suitable for various scenarios, such as indoor events, portraits in natural light, or overcast outdoor conditions.
- High ISO (e.g., ISO 800+): When dealing with low-light conditions or the need for a fast shutter speed to freeze motion, using a higher ISO is necessary. While higher ISO settings introduce more noise or grain, they enable photographers to capture images that would otherwise be impossible without additional lighting equipment. Night photography, concerts, or action photography are typical scenarios where higher ISO values are necessary.
Noise Reduction Techniques
To mitigate the effects of noise in digital photography, many cameras offer built-in noise reduction settings. However, aggressive noise reduction can sometimes result in a loss of fine details in the image. Alternatively, photographers can apply noise reduction during post-processing, allowing for more precise control over the noise reduction process.
Embracing Grain as an Artistic Element
In film photography, grain was a natural characteristic of the medium and was embraced as an artistic element, adding a unique texture and aesthetic to the images. Similarly, in digital photography, noise can be creatively utilized to achieve certain visual effects or enhance the mood of an image. In black and white photography, for instance, film-like grain can lend a nostalgic and evocative quality to the photo.
Conclusion
Understanding ISO and its impact on image quality is essential for photographers striving to achieve their desired results. By carefully selecting the appropriate ISO setting for each shooting situation and embracing the creative potential of noise or grain, photographers can confidently tackle challenging lighting conditions and produce captivating images that resonate with their artistic vision.
As with all aspects of the exposure triangle, practice, experimentation, and a keen eye for detail will ultimately lead to mastering the art of balancing sensitivity and grain to create visually stunning photographs.
The Interplay between Aperture, Shutter Speed, and ISO
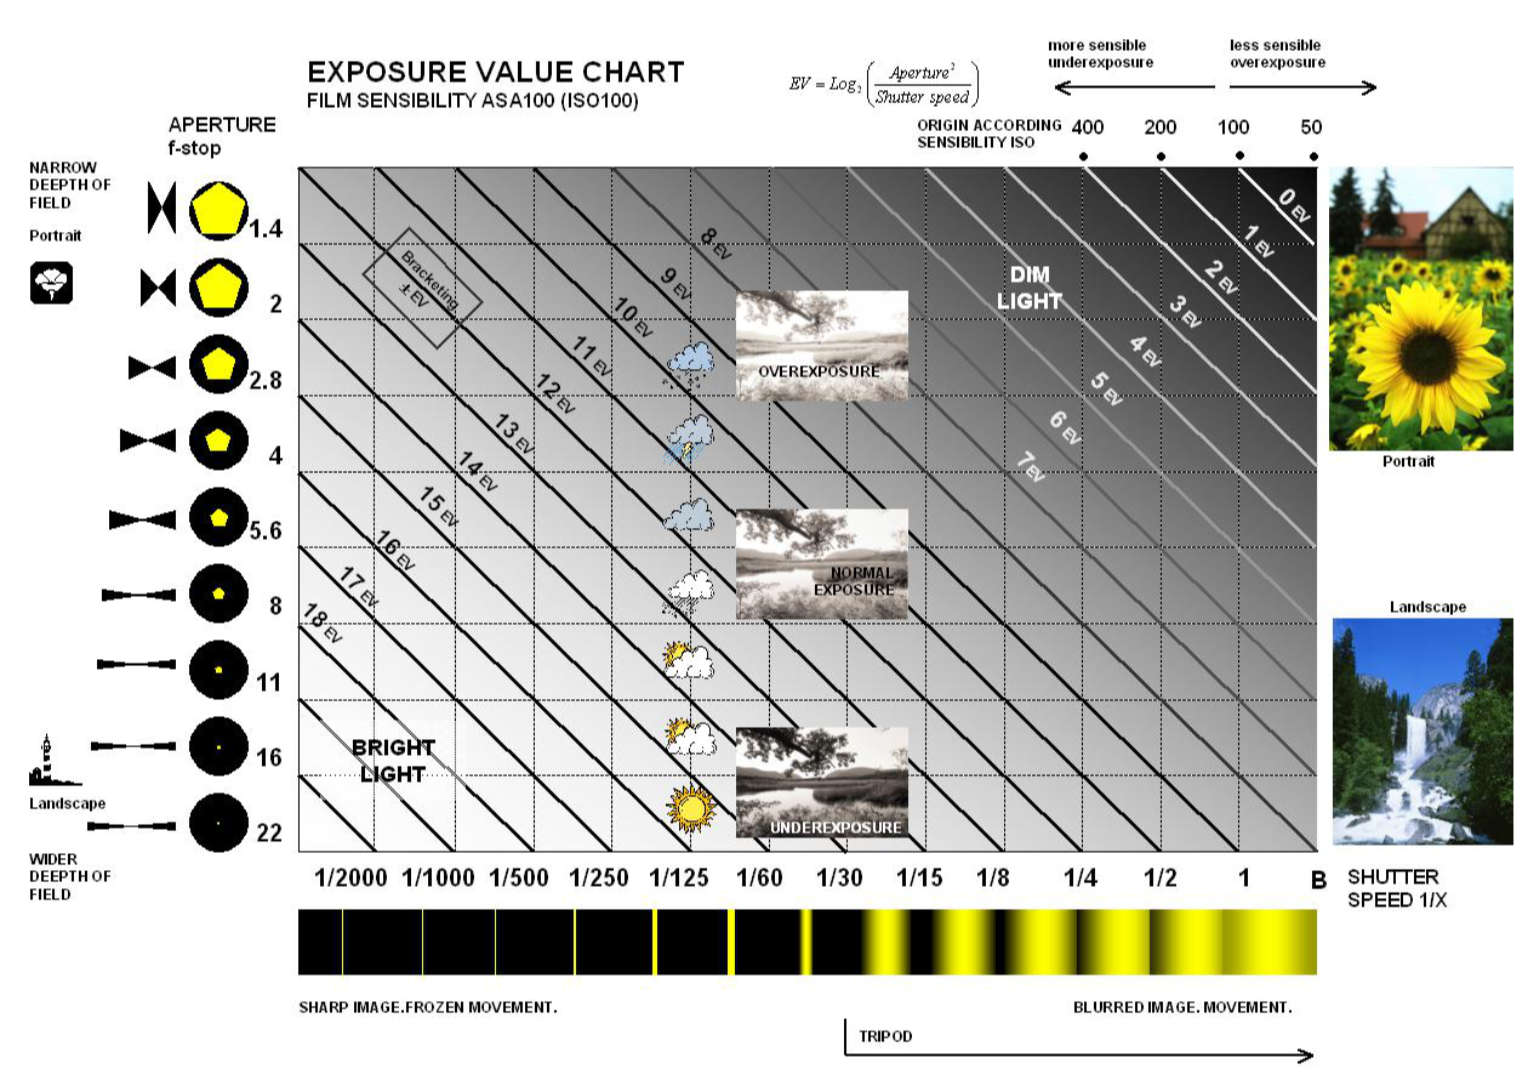
Exposure Value (EV)
The exposure value (EV) is a critical concept in photography that quantifies the amount of light in a scene. It represents the cumulative effect of the chosen combination of aperture, shutter speed, and ISO. Each change in these parameters results in a doubling or halving of the exposure value, known as a "stop" of light.
Understanding exposure value is crucial for photographers because it allows them to make informed decisions about how to adjust their camera settings to achieve the desired exposure for a given scene. For instance, if you increase the aperture by one stop to let in more light, you can compensate by either decreasing the shutter speed by one stop or decreasing the ISO by one stop to maintain the same exposure value.
Knowing how exposure value relates to the exposure triangle empowers photographers to adapt quickly to changing lighting conditions or creative requirements without compromising the final image's exposure quality. For example, in a low-light situation, a photographer might choose to open the aperture wider (lower f-stop number) to allow more light to enter the camera, while simultaneously increasing the ISO and possibly slowing down the shutter speed to balance the exposure and achieve the desired exposure value.
Exposure Compensation
Despite the advancements in modern camera metering systems, there are still situations where the camera's automatic exposure settings may not accurately interpret the scene's lighting conditions. High-contrast scenes, backlit subjects, or scenes with predominantly bright or dark areas can often confuse the camera's metering, resulting in overexposed or underexposed images.
This is where exposure compensation comes into play. Exposure compensation is a user-friendly tool available in many cameras that allows photographers to manually adjust the camera's exposure settings relative to the metered exposure value. It typically ranges from -2 to +2 stops, where negative values (-2) decrease the exposure, making the image darker, and positive values (+2) increase the exposure, making the image brighter.
For instance, when shooting a backlit subject, the camera's metering might be fooled by the bright background, resulting in an underexposed subject. By dialing in a positive exposure compensation, the photographer can instruct the camera to brighten the exposure, ensuring the subject is correctly exposed even in challenging lighting conditions.
Similarly, when dealing with high-contrast scenes where there are both bright highlights and deep shadows, the camera's metering might struggle to find a balanced exposure. In such situations, adjusting the exposure compensation can help preserve detail in both the highlights and shadows, preventing them from being completely blown out or lost in darkness.
Fine-Tuning Exposure for Creative Effects
In addition to its practical use in correcting exposure in challenging lighting situations, exposure compensation can also be used creatively to achieve specific visual effects. For example, intentionally underexposing a scene can create a moody and dramatic atmosphere, while overexposing can create a dreamy and ethereal look.
Photographers often use exposure compensation during shooting to achieve the desired mood or atmosphere directly in-camera. However, it's essential to review the histogram and the resulting image on the camera's LCD screen to ensure that the exposure compensation has indeed achieved the intended effect without sacrificing essential details.
Conclusion
The interplay between aperture, shutter speed, and ISO is the key to achieving optimal exposure in photography. Understanding exposure value and how it is affected by adjustments in these three parameters allows photographers to maintain control over the final image's quality and appearance.
Exposure compensation is a valuable tool that empowers photographers to take creative control over their images, allowing them to overcome challenging lighting conditions and achieve specific visual effects.
By mastering the interplay between aperture, shutter speed, ISO, and exposure compensation, photographers can confidently approach any scene, unleashing their artistic vision and capturing stunning photographs that resonate with viewers on a deep and emotional level. As with all aspects of photography, practice, experimentation, and a keen eye for detail will refine these skills and elevate your photography to new heights of excellence.
Learn also: What is a DSLR camera
Mastering the Exposure Triangle: Tips and Techniques
Mastering the exposure triangle is a crucial skill for photographers seeking to take their images to the next level. Understanding how aperture, shutter speed, and ISO work together can greatly enhance your creative control over the final result. Let's explore some additional tips and techniques to further refine your exposure mastery:
Understanding Histograms
Modern cameras offer various metering modes, each designed to interpret the scene's lighting conditions differently. Understanding and using the appropriate metering mode in different situations can lead to more accurate exposures.
- Evaluative (Matrix) Metering: This mode evaluates the entire frame's lighting and calculates exposure based on complex algorithms. It works well for balanced scenes with even lighting, such as landscapes or portraits with a well-lit background.
- Center-Weighted Metering: Center-weighted metering places greater emphasis on the exposure readings from the center of the frame while still considering the overall lighting. It is suitable for subjects with significant contrast, as it prioritizes the center, where the main subject often lies.
- Spot Metering: Spot metering evaluates only a small area in the center of the frame, typically around 2-5% of the total viewfinder area. This mode is ideal for high-contrast scenes or when precise metering of the subject is crucial, regardless of the background's brightness.
- Partial Metering: Similar to spot metering but covering a larger area, partial metering often includes 10-15% of the frame. It is well-suited for scenes with moderate contrast, as it provides a balance between spot and center-weighted metering.
Selecting the appropriate metering mode is essential, as it significantly impacts how the camera interprets the scene's exposure. By understanding these modes and their applications, photographers can ensure accurate and consistent exposures in various shooting conditions.
Exposure Bracketing
Exposure bracketing is a valuable technique used to capture multiple shots of the same scene with varying exposure settings. This method is especially useful in high-contrast scenarios, where it may be challenging to determine the correct exposure in a single shot, or in situations where photographers are unsure about the best exposure values for a particular scene.
To bracket, set the camera to continuous shooting mode and take a series of shots, each with slightly different exposure settings. Typically, photographers bracket by adjusting either the aperture or shutter speed, while keeping the ISO constant. For example, if capturing a landscape with a bright sky and dark foreground, bracketing allows you to take one shot to expose for the sky, another for the foreground, and a third with the camera's metered exposure.
Bracketed shots can be later analyzed, and the best-exposed image can be selected during post-processing, or they can be merged using HDR (High Dynamic Range) techniques to create a single image that retains details from the entire tonal range.
Embracing bracketing not only enhances the chances of capturing perfectly exposed images in challenging conditions but also provides the opportunity for creative exploration. It allows photographers to experiment with different exposure effects and create unique, dynamic images that express their artistic vision.
The Importance of White Balance
While not directly part of the exposure triangle, white balance is an essential aspect of achieving accurate and pleasing color rendition in your photographs. White balance refers to the adjustment of colors in an image to ensure that white objects appear truly white, regardless of the light source.
Different light sources emit different color temperatures, which can result in images with a color cast. Understanding and setting the appropriate white balance can significantly impact the mood and visual appeal of your photos. For instance, using the "Daylight" white balance setting outdoors can enhance the warm tones of a sunset, while selecting "Tungsten" indoors can counteract the orange hue of artificial lighting.
Cameras offer several white balance presets, such as daylight, cloudy, shade, tungsten, fluorescent, and flash. Additionally, many cameras provide the option to manually set the white balance by using a gray card or a neutral-colored object in the scene.
Being aware of the impact of white balance and using it deliberately will result in more accurate and vibrant colors in your images, elevating your photography to a new level of visual excellence.
Conclusion
Mastering the exposure triangle is a journey of continuous learning and experimentation. By understanding the intricate interplay between aperture, shutter speed, and ISO, you gain creative control over your images and can confidently tackle diverse shooting conditions.
Utilizing tools like histograms, metering modes, and bracketing further refines your exposure skills, allowing you to capture well-exposed images even in challenging lighting situations. Moreover, being mindful of white balance ensures accurate and captivating color renditions in your photographs.
As you continue to explore and practice these techniques, your ability to control exposure and create visually compelling images will grow. Embrace the learning process, unleash your creativity, and let the exposure triangle be the gateway to unlocking the full potential of your photography.
With each shot, you'll refine your skills, develop a discerning eye for detail, and ultimately produce images that convey powerful narratives and evoke emotions, leaving a lasting impact on your audience. So, venture forth with your camera in hand, explore the world through your lens, and let your passion for photography shine through in every frame you capture.
Landscape Photography Masterclass
Master Your Photography Skills!
Discover new shooting techniques, learn about post-production strategies, and listen to interviews with renowned landscape photographers, all designed to take your photography to the next level.


